As the online business world continues to evolve, so do the tools and strategies that businesses use to attract, engage, and convert customers. One of the most effective tools for driving sales and revenue is ConvertBox, a powerful lead generation and conversion optimization platform that has helped countless businesses grow their online presence and boost their bottom line.
In this post, we'll explore what ConvertBox is, its benefits and uses, pricing, and why it's the best tool to increase your sales. Let’s dig into my ConvertBox review!
What is ConvertBox?
ConvertBox is a web-based platform that allows businesses to create personalized and targeted opt-in forms and call-to-action messages for their website visitors. It’s a versatile tool that provides a variety of features and options to help businesses grow their email list, increase sales, and optimize their website for conversion.
With ConvertBox, businesses can create custom opt-in forms, exit-intent popups, welcome mats, and other types of on-site messages to engage with their visitors and drive them toward conversion.
What Are The Benefits & Uses of ConvertBox?
1) Email List Growth and Lead Generation
One of the primary benefits of ConvertBox is its ability to help businesses grow their email list and generate more leads. With ConvertBox, you can create customized opt-in forms that match your brand’s look and feel, and target them to specific pages or sections of your website. ConvertBox also provides various trigger options, such as exit-intent popups (great for abandoned cart sequences!) or time-based triggers, that can help increase opt-in rates and capture more leads.
2) Offer Deals and Discounts
Another powerful use case for ConvertBox is to offer exclusive deals and discounts to your website visitors. ConvertBox allows you to create custom messages that display targeted offers and promotions to your visitors based on their behavior and interests.
You can also set up rules and conditions to ensure that the right people see the right offers at the right time, increasing the likelihood of conversion.
3) It’s Completely Easy to Use
One of the most significant advantages of ConvertBox is its user-friendly interface and ease of use. The platform is designed to be intuitive and straightforward, even for those with little or no technical experience. The drag-and-drop editor and pre-built templates make it easy to create professional-looking opt-in forms and messages without the need for coding or design skills.
No coding skills are required to get started, and use ConvertBox to grow your business!
4) No Monthly Fees or Recurring Subscriptions
I love a good lifetime deal on things I use because who doesn’t want to save money?
ConvertBox is a one-time payment tool with no recurring fees or monthly subscriptions, making it a cost-effective solution for businesses of all sizes. Once you’ve purchased a license, you have access to all of the platform’s features and updates, with no additional costs or hidden fees.
ConvertBox Pricing: Is It Worth It?
ConvertBox pricing is currently $495, which is a one-time fee.
Sure, the lifetime pricing may seem a bit steep upfront compared to other opt-in form tools, but trust me, the investment is well worth it. If you're serious about taking your business to new heights, ConvertBox is the way to go. Plus, when you see my affiliate bonus for grabbing ConvertBox with my link, it’ll be an even easier yes.
Especially if you are making email marketing and sales funnels a priority in your business. No other lead generation tool compares to ConvertBox.
Final Thoughts
ConvertBox is an incredibly powerful tool that can take your online business to the next level. With its user-friendly interface, customizable opt-in forms, and advanced targeting options, you can grow your email list, increase sales, and optimize your website for conversions like a pro.
Ready to purchase ConvertBox? I have a huge affiliate bonus if you buy the ConvertBox lifetime deal through my affiliate link! Check out the details here.
If you're a coach, you know that selling your coaching packages can be a challenging task. You want to attract the right clients who are willing to invest in themselves and their growth, but sometimes it feels like you're hitting a wall. The truth is there are common mistakes that coaches make when selling their coaching packages that can hinder their success. In this post, we'll explore the top five mistakes coaches make when selling their coaching packages and provide tips on how to avoid them.
By the end of this blog post, you'll better understand how to effectively sell your coaching packages and attract the clients you want to work with. So let's get started!
The Top 5 Mistakes Coaches Are Making:
Are you a coach who's struggling to sell your coaching packages?
You're not alone.
Many coaches find it challenging to market their services effectively. But fear not because I’m here to help by exploring some of the biggest mistakes you might be making.
Mistake #1: Having Confusing Packages
One of the most common mistakes coaches make is having confusing packages. If your packages are not clearly defined, potential clients will hesitate to invest in your coaching services. Make sure your packages are easy to understand and clearly communicate what is included in each one.
Mistake #2: Not Talking About The Benefits
You know that your coaching packages can help clients achieve their goals, but are you highlighting those benefits when marketing your services? If not, you're making a big mistake. Clients aren't just investing in your services but in their own growth and development. So, ensure you're clearly communicating the benefits of your coaching packages.
Think about it: what are the benefits your clients will receive from working with you? Will they gain more confidence, achieve better work-life balance, or improve their relationships?
Whatever the benefits are, make sure you're highlighting them in your marketing efforts. When potential clients see how your coaching packages can help them grow and achieve their goals, they'll be more likely to invest in your services.
Mistake #3: Not Charging Enough
Are you undervaluing your coaching services? Are you charging too little for your coaching packages? If so, it's time to make a change. When you charge too little, you're not only hurting your business, but you're also sending the message that your services are not valuable. That's not the message you want to send, right?
So, let's get down to it. Research the market and determine what other coaches charge for similar services. But don't just base your prices on what others are charging. Remember, you provide unique value to your clients. Take the time to identify the value you provide and set your coaching package prices accordingly.
When you properly price your packages to reflect the experience you bring, the results you help your clients attain, and the unique features of your coaching package, you'll attract clients who value your services and are willing to invest in themselves. And yes, don’t be afraid to raise your rates periodically as you get more and more impactful outcomes for your clients!
Mistake #4: Not Knowing Who Your Ideal Audience Is
You need to know who your ideal audience is to be able to market your coaching packages effectively.
Think about the clients you enjoy working with the most. Who are they? What are their needs and preferences? What are their pain points, and how can your coaching packages help them overcome those challenges?
Once you've identified your ideal client, tailor your marketing efforts to their needs and preferences. Use language that resonates with them, and focus on the benefits they'll receive from working with you.
When you market your coaching packages to the right audience, you'll attract clients who are the best fit for your services. They'll be more likely to invest in your coaching packages, and you'll be able to help them achieve their goals.
So, take the time to identify your ideal audience and start marketing your coaching packages to the people who need them most.
Mistake #5: Not Having a Streamlined Sales Process
A streamlined sales process can make all the difference in converting potential clients into paying ones. Make sure your sales process is straightforward, easy to understand, and leads potential clients down a path to purchase.
Want to know the best way to do that? Using ThriveCart! Yes, ThriveCart can absolutely be used for coaching services and packages. I’ve created several ThriveCart templates that are designed for coaches, including:
In conclusion, selling your coaching packages doesn't have to be a daunting task. By avoiding these common mistakes and implementing the tips provided, you can effectively market your services and attract the clients you want to work with.
So, you recently bought ThriveCart? Congratulations! Now, you want to make sure you’re making the most of your business investment. In this blog post, I’m sharing the top ways to make more with ThriveCart.
One of the best things ThriveCart did was add Learn as a feature. Now with ThriveCart Learn, you don’t have to host your courses, digital products, or even membership on another platform.
Saving $50 – $200 per month vs. paying for another course platform will pay for your ThriveCart investment within a few months.
And yes: Thrivecart Learn, the built in course platform, is included with your one-time purchase!
One of the quickest and easiest ways to make more money using ThriveCart is by setting up bump offers on your checkouts. When choosing a bump offer to include, think about what would be a great addition to the product they are purchasing.
What else would be of interest to them? What could help them take action sooner?
Why Bump Offers Work:
Bump offers give your customers the chance to add complementary items to their purchases. Think about it, they're already buying from you, so they're more likely to take advantage of the extra offer. Plus, it's an easy and quick way for you to boost your revenue!
Tripwires
A tripwire is a special offer set up on a thank you page after someone opts into a freebie or lead magnet. Why not introduce these new subscribers to your offers by introducing them to a tripwire offer?
You can easily set this up with ThriveCart by having a $0 product (the freebie or lead magnet) and then having them redirected to your tripwire page after signing up.
Why Tripwires Work:
Tripwires are popular and work well because they create urgency. Most tripwires are offered using an evergreen countdown timer for 10-20 minutes. That means they will only see this offer once at this price. Tripwires are also usually lower ticket offers, which will have fewer objections and result in more purchases.
Upsells
An upsell is when someone has just purchased something, and you offer them a higher-priced option. This could be a totally different product, or it could be something where if someone signs up for a monthly membership, you offer them an upsell into an annual membership immediately after purchase.
And yep, you can set this up with ThriveCart, too!
Why Upsells Work:
Depending on the offer, upsells can work really well, and because an upsell is a higher price, it means more money for you if anyone takes advantage of it. So, what do you have to lose by offering one?
Another revenue-generating feature that ThriveCart has is abandoned cart emails. Why not follow up with someone who entered their email but didn’t complete the checkout? Even if the abandoned cart email sequence doesn’t convert, you might learn more about why they decided not to purchase. That information can be invaluable for your marketing, messaging, and copy!
Final Thoughts
In conclusion, ThriveCart is a powerful platform that can help you maximize your earnings by leveraging its various features. From hosting your courses and digital products with ThriveCart Learn to setting up bump offers, tripwires, and upsells on your checkouts, there are plenty of ways to boost your revenue.
Additionally, the abandoned cart emails feature allows you to follow up with potential customers who didn't complete their purchases, providing insights that can help you improve your marketing strategy.
By using ThriveCart's revenue-boosting tools, you can make the most of your investment and grow your business.
And don’t forget to use all of the templates in the ThriveCart Template Shop for designing beautiful checkout pages and sales funnels!
An affiliate program is a powerful way to increase your online sales by partnering with other people who promote your products or services. An affiliate program is a system that allows you to manage your affiliates, track their performance, and reward them for driving sales.
If you want to create an affiliate program for your business, one great tool to consider is ThriveCart. ThriveCart is an all-in-one platform that makes setting up and managing your affiliate program easy. With ThriveCart, you can create custom affiliate links, set commission rates, and track all your affiliates' sales.
Should You Create an Affiliate Program?
If you want to increase your sales and reach a wider audience for your digital products, courses, or programs, creating an affiliate program might just be the ticket. One important thing to think about is your pricing. Make sure that your pricing has enough room to accommodate affiliate commission.
What are the Benefits of Creating an Affiliate Program?
1. An Affiliate Program Grows Your Reach & Audience
Firstly, an affiliate program lets you partner with other people who can promote your products to their network and audience. This means you can tap into new markets and connect with potential customers you might not have reached before.
Plus, it's a win-win situation for both you and your affiliates – they earn a commission for every sale they generate, and you get more sales without having to spend a lot of money on advertising.
2. An Affiliate Program Increases Your Sales & Revenue
Secondly, an affiliate program is a great way to boost your revenue. By offering commissions to your affiliates, you're incentivizing them to promote your products and services, which means more sales for you.
It's a simple and effective way to increase your bottom line without having to invest a lot of time or money into marketing.
3. An Affiliate Program Builds Connections & Partnerships
Thirdly, an affiliate program can help you build relationships with other business owners and affiliates in your industry. This can lead to collaborations, joint ventures, and other opportunities to grow your business. Plus, it's always good to have a network of like-minded individuals who share your passion for your products and services.
4. An Affiliate Program Is An Affordable Way to Market Your Business
Lastly, creating an affiliate program is a cost-effective way to market your business. Unlike traditional advertising, where you have to spend a lot of money upfront to reach a large audience, with an affiliate program, you only pay your affiliates when they generate a sale. This means you only pay for results, which can be a great way to maximize your return on investment.
Things to Think About When Planning Your Affiliate Program:
If you’re deciding to go for it and create an Affiliate Program for your digital products, courses, and programs, there are a few things to think about first.
1) How You’ll Get People Into Your Affiliate Program
The first thing to consider is how to attract potential affiliates to your program. You can start by reaching out to people in your network or posting on social media. You can even begin to ask buyers to join your affiliate program in your purchase email sequence.
You'll want to create a compelling message that highlights the benefits of becoming an affiliate, such as earning a commission, connecting with like-minded individuals, and helping promote products you believe in. Make it easy for people to sign up and provide them with all the information they need to get started.
2) How You’ll Keep Affiliates Updated
Once you have affiliates signed up, it's essential to keep them in the loop about new products, promotions, and other updates. You can do this through email newsletters, a private Facebook group, or other forms of communication. It's also a good idea to provide your affiliates with marketing materials such as banners, social media graphics, and email templates to make it easier for them to promote your products.
3) What Your Affiliate Commission Will Be
One of the most important aspects of your affiliate program is your commission structure. You'll want to offer a competitive commission that incentivizes your affiliates to promote your products.
A good rule of thumb is to offer a commission of around 30% to 50% of the sale price. However, it's important to do some research and see what other businesses in your industry are offering to ensure that your commission rate is fair and attractive to potential affiliates.
4) Your Affiliate Terms and Conditions
Finally, it's essential to have clear terms and conditions in place for your affiliate program. This should include information about how commissions will be paid, any restrictions on how affiliates can promote your products, and what happens if an affiliate violates the terms of your program.
You'll also want to include information about how long cookies will last, what happens if a customer refunds a purchase, and any other details that will help ensure your program runs smoothly and fairly.
I got my affiliate program terms and conditions from my lawyer, Braden Drake – it’s included in his legal template collection, The Contract Club, and it’s incredibly affordable.
Before you can create your affiliate program, you'll need to set up your products and payment gateways in ThriveCart. This includes adding your products, setting prices, and connecting your payment gateway to ensure that you can accept payments.
Set Up Your Affiliate Program
Once your products are set up, it's time to create your affiliate program. With ThriveCart, this is a simple process that involves allowing affiliates to promote each product and selecting the affiliate options. You'll then be able to customize your affiliate details by product by setting your commission rate, cookie duration, and other important information.
Customize Your Affiliate Program
ThriveCart makes it easy to customize your affiliate program to meet your needs. You can set different commission rates for different products, create custom landing pages for your affiliates, and even track the performance of individual affiliates. This flexibility makes creating an affiliate program that works for your business quick.
Manage Your Affiliate Program
Finally, it's important to actively manage your affiliate program to ensure it runs smoothly. With ThriveCart, you can easily track sales and commissions, manage affiliate payments, and even automate certain tasks. This makes it easy to focus on growing your business while your affiliate program runs in the background.
Final Thoughts
Creating an affiliate program with ThriveCart is a straightforward process that can help you boost sales, expand your reach, and build relationships with other business owners and affiliates. By following these steps and taking advantage of ThriveCart's powerful features, you can create an affiliate program that works for your business and helps you achieve your goals.
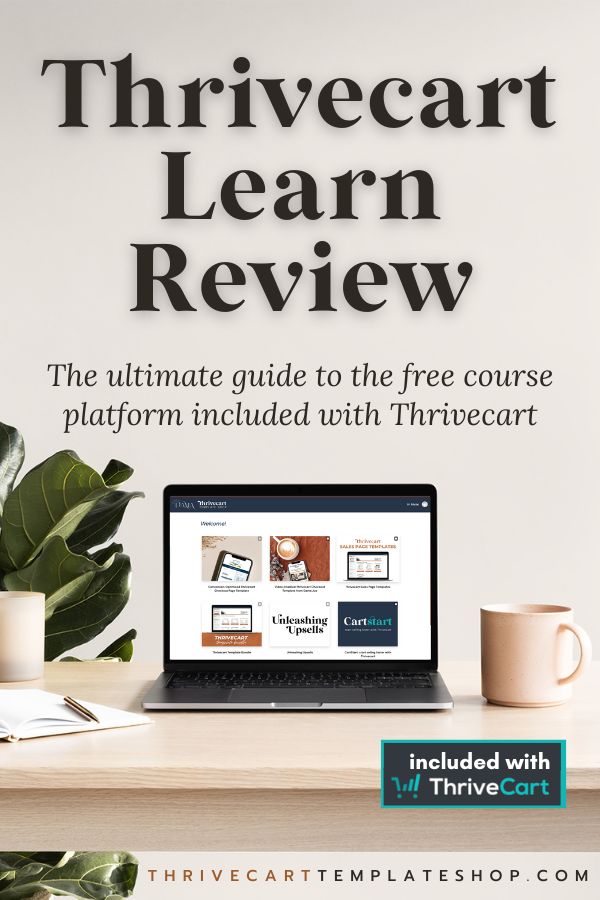
When ThriveCart first came out with ThriveCart Learn, I was beyond excited and knew that it would change the game for course creators. Because ThriveCart Learn is still relatively new as a course platform, I get asked about it all the time. In this blog, you will learn everything you need to know about using ThriveCart Learn.
If you’re thinking about purchasing ThriveCart or switching your digital products and courses to ThriveCart Learn, keep reading!
What is ThriveCart Learn?
ThriveCart Learn is a course hosting platform from ThriveCart that was introduced in 2021. You can host courses, programs, digital products, and even memberships on ThriveCart Learn.
ThriveCart Learn Pricing:
ThriveCart Learn is included with your purchase of a lifetime ThriveCart account. The option to upgrade to the Learn+ version is available for an additional one-time price of $195.
ThriveCart Learn vs ThriveCart Learn Plus
What are some of the big differences between ThriveCart Learn and ThriveCart Learn+? I strongly recommend adding on the one-time upgrade to Learn+ because of these fabulous features included:
Bundles
You can easily create ‘bundles’ of products that someone will automatically be enrolled in by purchasing one product. This is an excellent feature if you want to sell bundles of products or automatically add access to a bonus.
Advanced Tagging and Sequences
With Learn+, you can tag certain purchasers and give them access to exclusive lessons (like for pay-in-full bonuses). There are many ways you can use the advanced sequences and tagging features!
Custom Subdomains
Want to have a custom subdomain for your courses and login? You can easily set this up in minutes with Learn+.
Student Imports
With Learn+, you can easily import students using a CSV file.
How to Use ThriveCart Learn and Learn Plus
ThriveCart Learn is super easy to use! Probably the most significant benefit of using ThriveCart Learn (especially if you’re already using ThriveCart for your checkout pages) is no recurring fee. For the same type of features, on Kajabi, for example, you could be paying upwards of $199 per month.
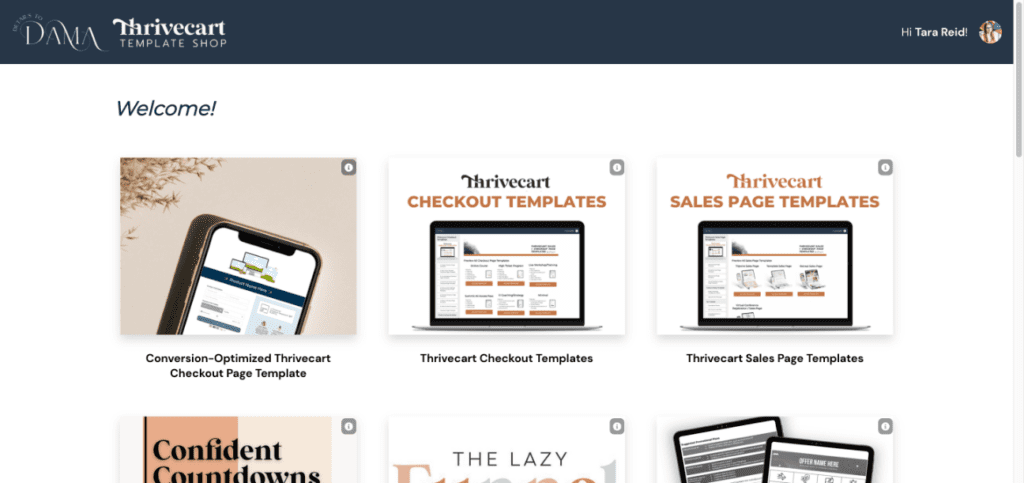
Here’s what it looks like when a student is logged in to my ThriveCart Learn Dashboard:
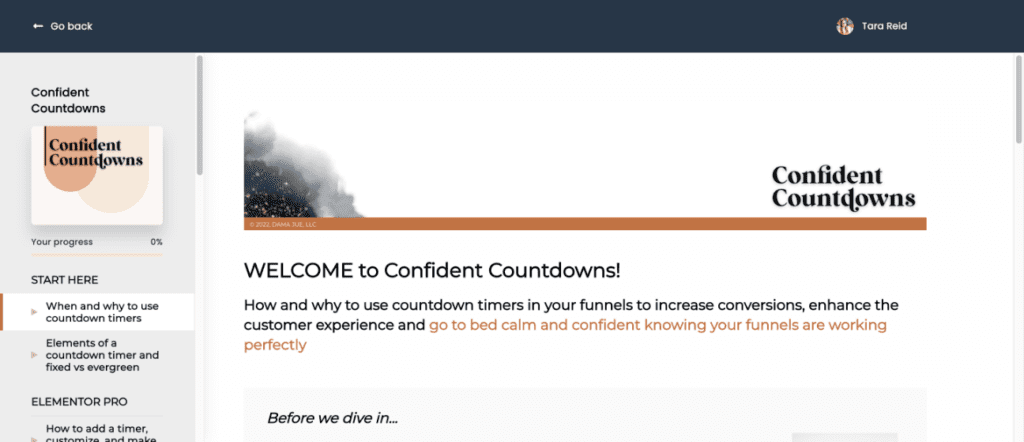
And here’s how I’ve branded some of my individual courses hosted on ThriveCart Learn:
Your Biggest ThriveCart Learn Questions:
1) Is it possible to easily import students from another course platform?
Yes! If you purchase the one-time upgrade of Learn+, you can easily import students from a CSV file.
2) Can you host a membership on ThriveCart Learn?
You can! You would set up your checkout pricing as a subscription model and host the membership content inside ThriveCart Learn. The only drawback to a membership is that ThriveCart doesn’t automatically figure out end dates.
For example: A customer signs up for an annual membership in March and cancels in August. They paid for a year, so they should still have access until the following March. However, ThriveCart removes access immediately. So, you might have to set up some back-end admin processes to make it work for you and your membership. See this article for tips on how to handle that.
3) How tech-savvy do I need to be to use ThriveCart Learn?
ThriveCart Learn is pretty easy to use once you get the hang of it. There are certain hacks you can learn to make things easier. If you get stuck, check out this epic resource for Thrivecart.
4) How can I add videos to lessons?
ThriveCart is not able to host videos. Any videos in ThriveCart Learn need to be embedded into the lesson from another video hosting service. The most popular options are Vimeo or, my personal choice – Screencast-O-Matic. I use it to record, edit and host all my course content..
5) How can I easily brand and customize ThriveCart Learn?
ThriveCart Learn is the most customizable course platform out there! You can customize everything to make it your own and match your brand. There are so many design settings!
Time-saving hack: For every new product you create – set up the branding, style, and various blocks as a ‘template lesson’ that you can duplicate. That way, all of your design settings are saved and will look cohesive.
ThriveCart Learn Review: Final Thoughts
I can’t recommend ThriveCart Learn enough! If you’re ready to say goodbye to the costly monthly fees and move things over to ThriveCart Learn – you won’t regret it. ThriveCart Learn is powerful, easy to use, and flexible – the perfect combination for your online course business.
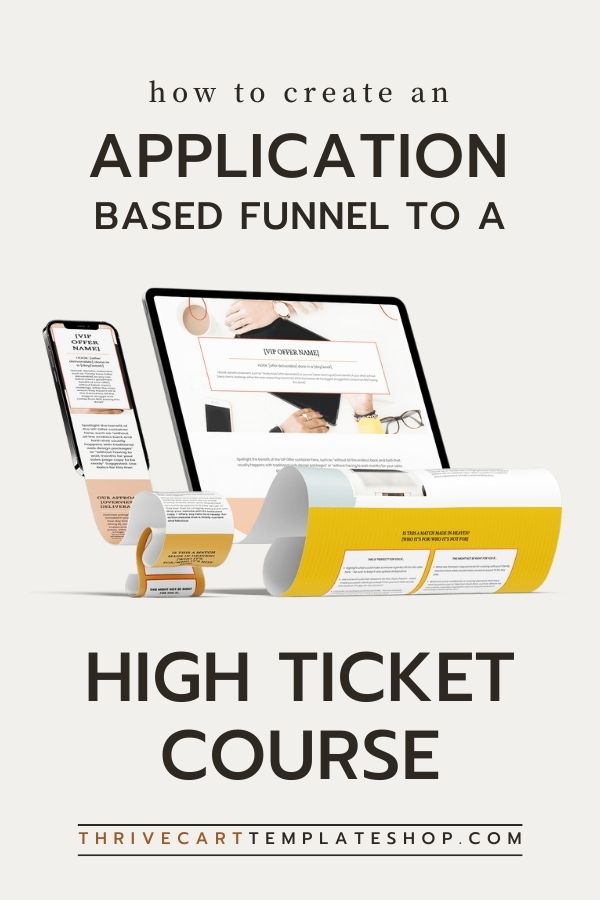
Sales funnels are a marketing tool that helps guide your audience through the steps they need to take to complete a transaction or purchase. Today, we will look at creating an application based funnel for your high ticket course or program. We’ll discuss some key points below that will help guide you in designing the perfect funnel for your high ticket course.
At its core, a high ticket course funnel consists of several steps your potential customers must take to complete the purchase. For example, this might include an initial sign-up or form completion to pitch your course, followed by some educational content about your program and what it can offer to potential students.
What is Considered a High Ticket Course?
High ticket sales pricing is subjective. What high ticket means to one person may not be high ticket to another person.
Generally, high ticket sales funnels are for offers of over $3,000 and upwards of $20,000+. These courses and programs are designed for people who want a more personal experience or want to learn from a specific source. If you are selling a high ticket course, consider putting extra time into creating an application based funnel.
To create an application based funnel for your high ticket course, you can use applications like Airtable (my personal favorite) or Typeform. These types of tools allow you to collect all of the application information you need.
How Does an Application Based Funnel Work?
An application based funnel (or form funnel) will help you offer a high ticket course to your audience that includes an application process before someone can join. With the application in your funnel, you can guide people through purchasing your high ticket course.
The key component of this type of funnel is ensuring everything is clear regarding what your audience should do next. It’s important that you include clear instructions on what they need to do and where they need to go if they have any questions about their purchase.
What Are the Benefits of an Application Based Funnel?
An application based form funnel's benefits can be seen as a two-fold process.
The first benefit is that it helps you fulfill your promises to the customer. As discussed, if you are selling a high ticket course, your ultimate goal is to get people enrolled in the course who are ready to take action.
The second benefit of using an application based funnel is that it helps increase retention and satisfaction for your customers who follow through with their promises. This benefit lies in how easy or difficult it is for people trying to enroll in a high ticket course.
1. More Control Over the Enrollment Process
A high ticket course or program should have a high ticket experience and enrollment process.
An application form funnel allows you more control over who is invited into the course and more control over the entire onboarding process for new students.
This type of enrollment gives you more control over who enrolls in your course and ensures that your customers are fully aware of what’s going on before completing their purchase.
When it comes to your onboarding process, automation is critical! You can easily set up workflows for when an application is accepted or not, so you aren't manually doing tasks like sending emails, following up, or adding access for new students.
2. Generates Exclusivity for High Ticket Sales
One of the most important aspects of creating an application based funnel is ensuring they are exclusive. There's no reason to have an application based funnel if you're going to accept everyone who applies. It needs to be ethical and exclusive. There needs to be a genuine reason behind the application based model.
3. More Sales If Your High Ticket Sales Funnel Engagement is Set Up Properly
That's because the application process encourages those most likely to take action and have a high likelihood of success with your program, product, or service to join your course. Because the application process helps ensure that only those with a genuine interest in your program are enrolled, you may see an increase in revenue and an improvement in return on investment for your business.
What Are the Disadvantages of an Application Based Funnel?
There are a few disadvantages of an application based funnel, but the main one is that it could turn people away. Especially if you don't have visible pricing listed on the sales page prior to someone filling out an application.
While deciding to show pricing or not is a personal choice, it's important to consider the following:
1) If no pricing is listed, it could turn away ideal students because they imagine the price is outside their budget.
2) If pricing is listed, it could turn away people who can't afford the cost of your high ticket course or program. This is good news because you'll have to process fewer applications and onboarding.
Tools to Use For An Application Based Form Funnel:
There are many different tools you could use to help automate your application based form funnel, but here are a few suggestions:
1) Airtable
As you can tell from my program, Bundle Formula, I love Airtable. It can be used as a completely automated onboarding system for your high ticket course or program. In fact, I manage my entire business with it, including my course content, my student experience, feedback, offboarding, engagement – everything. Curious about setting something like this up for your own group program? Check out this epic masterclass on how to do all that with Airtable.
2) Dubsado
You could also use Dubsado forms for the application form and create Dubsado workflows – one for accepted applications and one for not accepted applications.
3) ThriveCart
Of course, when it's time to process payment for your high ticket course or program, my tool of choice is ThriveCart! With my conversion-friendly checkout templates, you can completely customize and brand your checkout page.
4) Typeform
If you'd like a simpler way to create your application form, Typeform is a popular choice for creating fully functional and easy-to-use forms.
5) Zapier
If you're using multiple tools, you'll likely need to use Zapier to connect them and streamline your entire course and program processes.
Final Thoughts
An application based funnel is a powerful tool for businesses that offer high-ticket sales, courses, programs, or services.
It allows you to control and manage the enrollment process more closely, generating exclusivity and higher sales. However, it also has some potential drawbacks, including the risk of turning away ideal customers if you don't disclose pricing on your sales page.
As with any marketing strategy, it's important to carefully consider an application-based funnel's pros and cons before implementing one for your business. By doing so, you can be sure that you are maximizing its benefits while minimizing its disadvantages.
Design and copywriting are two of the most important aspects of any website. In fact, they can make or break a website. This is especially true when it comes to the checkout page. You will lose sales if your checkout page isn't designed and copywritten well. This blog post will discuss 10 design and copywriting secrets that will help improve your checkout page!
Checkout Page Design & Copy: What Is More Important?
When it comes to website design and copywriting, there is no doubt that both are critical for a successful website or checkout page. In fact, they can make or break your site, especially when it comes to the checkout page.
Online shoppers are a fickle bunch. If they don't like your checkout page, they'll leave and never come back. That's why it is so important to design your checkout page well. But what are some of the critical elements that you should focus on?
10 of the Best Design & Copywriting Secrets for Checkout Pages
Let's discuss the best 10 copywriting and design secrets that will help increase your conversion rate and generate more revenue for your business!
1) Design: Clear Layout
Your checkout page should be easy to read, with straightforward typography and an uncluttered layout. This will help keep online shoppers engaged and interested in completing their purchases. With our conversion-focused templates, you can have your ThriveCart checkout page become your sales page. But remember where they are coming from. Did they already receive information on the previous page they would have landed on?
2) Copywriting: Concise & Informative Text
In addition to a clear design, your copy should also be concise and informative. Avoid long blocks of text that are hard to read and blend together. Instead, break up your copy with bullet points and distinct sections to help online shoppers get the information they need quickly and easily.
3) Copywriting: Testimonials & Customer Reviews
Online shoppers are constantly looking for social proof before making a purchase. Adding testimonials or customer reviews on your checkout page can give them extra confidence to purchase. And yes, a screenshot of a positive comment on social media is okay to add too – just be sure to get permission from the poster or blur their name and photo to respect their privacy.
4) Design: CTA Button Colors
Your checkout page should include a clear and prominent call to action button that stands out. This will help increase conversions and encourage online shoppers to complete their purchases on your site. You can use contrasting colors like red, orange, or bright backgrounds with a contrasting CTA button color to create eye-catching designs.
5) Copywriting: Focus On the Benefits
Your copy should focus on highlighting the benefits of your products or services rather than simply listing out all the features. By focusing on what your customers will get out of your offer or product, you will appeal to their actual needs and encourage them to make a purchase.
To further alleviate any concerns that online shoppers may have about making a purchase from your checkout page, consider including risk-free guarantees or money-back offers if you have such a policy in place. This can help give them extra peace of mind and increase sales in the process.
7) Design: Add Visuals or Videos
Visuals and videos are another great way to engage online shoppers on your checkout page and convince them to complete their purchase. Use stock photos, graphic elements, icons, or branded photos. You can also use product demos or customer testimonials to add a more personal touch.
My favorite stock photo subscription sites are Styled Stock Society and ColorJoy because both feature high quality images, women of color, and women of all builds and sizes. Bonus points to Styled Stock Society for their absolutely spectacular collections and Canva templates, and for Color Joy’s amazing license that allows template sellers like me to use their images in my designs. We proudly feature and include stock photos from ColorJoy in many of our templates.
8) Copywriting: Clear & Direct Call to Action
Your copy should also clearly and directly tell online shoppers what they need to do in order to complete their purchase. This will help increase your conversion rate by focusing on the action that you want them to take.
9) Design: Always Double Check Mobile
No matter where your checkout page is hosted or created, always check the mobile version. In ThriveCart, it might make more sense to move some sections around for the mobile layout. This can help display your checkout page in the best possible way and encourage online shoppers to complete their purchases.
Heads up: every Thrivecart checkout and sales page in our template shop comes fully mobile optimized, optimized and designed with conversions (sales) as the primary focus, and ready for traffic.
10) Copywriting: Know Your Ideal Audience
I've done some professional conversion copywriting in my years as a funnel builder, but these days I prefer to work with some fantastic copywriters. The most critical and essential step for good copy on a checkout page is to do your research. You need to know your ideal audience so you can speak to them in your copy.
This means knowing their pain points, their goals, and their desired outcomes. By doing this research, you can craft copy that speaks directly to your ideal audience and compels them to complete a purchase on your checkout page. With these tips and tricks in mind, you can create a high-converting checkout page that online shoppers will love.
Want to know the copywriting resources I love and recommend?
Sandra van der Lee from Damn Copy has some amazing copy templates ready for you to make your own. I’ve used and love her templates in launches before and been very happy with the results!
BONUS THRIVECART CHECKOUT PAGE TIP #11:
If you use ThriveCart, add a link to your main website on your checkout page (probably in the footer is best, especially if you’re linking to your privacy policy and/or your terms and conditions). This provides your potential purchasers with an added level of trust AND gives you a backlink to your domain. Backlinks are great for SEO (search engine optimization)!
Final Thoughts
If you're looking for a design-focused solution that will improve your checkout page and increase conversions, turn to ThriveCart today! With our user-friendly checkout page templates and copywriting secrets, we'll help you generate more revenue for your business.
Want to launch your next digital course, group program, or service offer? Creating your live launch method can help you to love live launches again. When done correctly, live launches are a great way to build anticipation and excitement for your product or service. They can also help you to generate more sales and increase profits. In this blog post, we will discuss the steps that you need to take to create your own live launch method. We will also provide tips on how to market your product or service before the launch takes place.
Live Launches vs Evergreen
One of the key differences between live and evergreen launches is that live launches typically generate more excitement and anticipation as they take place in real time. This can be an advantage, as it allows you to build greater momentum leading up to your launch date and capture the attention of potential customers or clients.
However, live launches can also be energy draining.
The best live launch method is one you use in combination with an evergreen launch strategy! That way, you get the best of both worlds.
Get my free resource, How to Go Ever(Green), to create a better evergreen strategy and sales funnel.
The 3 Phases of a Live Launch Method
There are typically three phases to a live launch method: the pre-launch phase, the live launch itself, and the post-launch phase.
1) Phase One: Pre-Launch Marketing
The first step in creating your live launch method is to focus on pre-launch marketing efforts. This can include things like building anticipation and excitement on social media and running email marketing campaigns.
The goal of the pre-launch phase is to warm your audience up and get them ready to buy.
You're not necessarily selling here. You are providing value and building the know, like, and trust factor with your audience. You're getting them excited about what's coming up!
How Long Is the Pre-Launch Marketing Phase?
There is no one-size-fits-all answer here. Typically it's 2-6 weeks before your cart is open.
But it really depends.
I know that doesn't sound very helpful… but here are some things to think about:
How warmed up is your audience? Have you been marketing and showing up consistently? Is your offer's topic completely different from anything you've done before? Does your offer help with a problem your ideal customer is already aware of? If not, you should spend more time during the pre-launch phase creating that awareness first.
2) Phase Two: Live Launch
Once you have built up a strong base of pre-launch marketing activities, it's time to launch live! During this phase, you will typically hold live webinars or live Q&A sessions, where you can engage directly with your audience and answer their questions about your product or service.
This is the period of time when your cart is open, and all of your launch planning is happening.
In most cases, the highest launch days will be the first day the cart is open and the last day. So, if you find yourself in a middle of the cart slump, know that is normal. Don't stop engaging, networking, and talking about your launch!
Email Marketing Tip for Live Launches:
Not everyone on your list is interested in every offer. Maybe it's not the right time, or maybe it's not the correct format for them. That's okay! Add an opt-out feature to the top of your live launch sales emails so those people can opt out during the launch period but still remain on your email list.
How do you do that? With most email marketing providers, you can add a trigger or rule where when someone clicks on a link, a tag is added to their contact record in your email service provider. Then, make sure future promo emails for your launch are sent to everyone except people with that opt-out tag. I’ve done this successfully with MailerLite, ConvertKit, and ActiveCampaign.
3) Phase Three: Post-Launch
You did it! Your live launch has wrapped up, and sales of your offer have concluded, well done!
Now it is important to continue marketing your product or service in order to drive further sales and increase revenue, especially if you have an evergreen marketing strategy. I recommend making the offer available at full price year-round, and when your live launch is over, redirecting that sales page to the year-round, always-open offer for that product. You’d be surprised how many folks will join after the live launch is over, simply because they missed your emails or regretted not purchasing it during the launch.
This may involve running email marketing campaigns, promoting your product on social media platforms, or reaching out to potential customers or clients through other channels. With the right strategy and planning, a live launch can be an extremely effective way to grow your business.
During the post-launch phase, you'll also want to do a launch debrief to review your live launch.
What Should You Look At For a Launch Debrief?
There are several different factors that you should consider when doing a launch debrief, including your pre-launch marketing activities, live launch performance metrics such as webinar attendance or Q&A session engagement, and post-launch marketing performance.
This free guide on evergreen sales funnels will show you how to analyze your live launch and which pieces to repurpose for your evergreen funnel, includes a fillable workbook to help you identify your funnel's strengths and create an action plan, and my favorite tech tools to get all this done. Grab that here!
Other important elements to look at include customer feedback and reviews, as well as your overall sales results. By analyzing these various aspects of your live launch, you can identify improvement areas and continue optimizing your live launch method over time.
This data can also help you fine-tune your evergreen sales funnel for the course or offer. And when you're ready to run your next live launch, you'll know exactly what to focus on for even greater success!
Final Thoughts
Whether you are new to live launches or have been doing them for years, there is always room for improvement. By taking the time to plan, strategize, and optimize your live launch method, you can create a successful and profitable launch that will help grow your business over time.
And don't forget to make the more sustainable choice for more revenue and turn your live offer into an evergreen offer, too. Your income, audience, and sales, will thank you later.
With the correct live launch method and planning, you can make more money and love live launches again!
A new threat in Thrivecart account security are scams called Card Testing scams. In this post, I'll share my best tips for protecting your Thrivecart account from Card Testing scams and other security risks.
Along with protecting your Stripe and Paypal accounts, protecting your Thrivecart is also crucial for protecting your business, your digital assets, and ensuring you and your customers have uninterrupted access to their purchases if you use Thrivecart Lear to host your courses and digital products.
What are Card Testing scams and are Thrivecart accounts at risk?
Card testing scams are one of the most common scams and have recently become more prevalent with Thrivecart accounts. Here's what happens: scammers purchase or otherwise acquire -aka steal- lists of credit card numbers. Before they make big purchases with them, they first want to test and see which cards are still valid, active accounts, so they make a LOT (hundreds, or sometimes thousands) of small purchases, often for $0.00 or as little as $1 or as much as $10, to see which transactions go through. They need a valid payment processor for their scam, so they might use an unsuspecting Thrivecart account or checkout to test their purchases. Once their small purchase goes through, they then move on to make bigger purchases with that credit card, for luxury goods, clothing, electronics or other expensive purchases.
How to know if you are under a Card Testing attack and what to do
I recently spoke with two creators who had to deal with a Cart Testing attack on their Thrivecart and Stripe accounts. Each scam will be different, but I want to share some similarities so you can recognize what's happening and take immediate action.
Both creators sell digital products via their website and take payment via Thrivecart. Their attacks occurred between December 2022 and January 2023.
Here are the similarities between two recent card testing attacks involving Thrivecart and Stripe:
Neither creator saw any unusual activity in their Thrivecart account – no new transactions, purchases, refunds, etc.
Their Thrivecart and Stripe logins had not been compromised and they did not lose access to their dashboards or accounts. Their real customer data was not breached or compromised
Their attacks started gradually, with just one or two small charges, either for $0 or $6, a day, and then increased. It's clear that these were processed via a bot
The customers whose cards the scammers were using were not charged, as the charges were either $0 or were marked as pending in Stripe, but in some instances, the attempted charge still showed up on the customer's credit card statement
These creators only became aware they were under attack when they saw the pending charges when they logged in to their Stripe accounts – again, there were no transactions or changes on Thrivecart, or when they were contacted about the attempted charges customers saw on their credit card statement.
Stripe may or may not notify you of a potential attack – one of these creators received a single email from Stripe after weeks of being under attack, the other was never contacted by Stripe
In both instances, Thrivecart and Stripe both claimed the breach was on the other's platform. The transactions were processed via Open API via Stripe, but associated with Thrivecart products (as in, there was one product singled out and used to test thousands of cards). If any funds had actually been processed, the creators would have had to refund the charges and eat the Stripe fees.
Both creators could only stop the attack by pausing or requesting a temporary hold on their Stripe account. Their Thrivecart accounts were able to function normally using Paypal as a payment processor.
If you think you may be under a card testing attack, immediately open support tickets with Thrivecart and Stripe. You may also want to have Stripe freeze your account. Lastly, consider creating a notification for your site (such as a pop up or a footer bar notification) that you are aware of the transactions and are taking action. While that may seem scary and vulnerable, it's never a bad thing to be as transparent as possible and have documented proof that you notified site visitors of a potential issue as the people who are innocent victims of the scam may be looking up your site to investigate the problem.
As with all things Thrivecart account security and general online security, the best course of action is to prevent falling victim to card testing scams and other potential security issues for your e-commerce business in the first place with a few basic preventative steps.
Here are 5 tips to protect your Thrivecart account security:
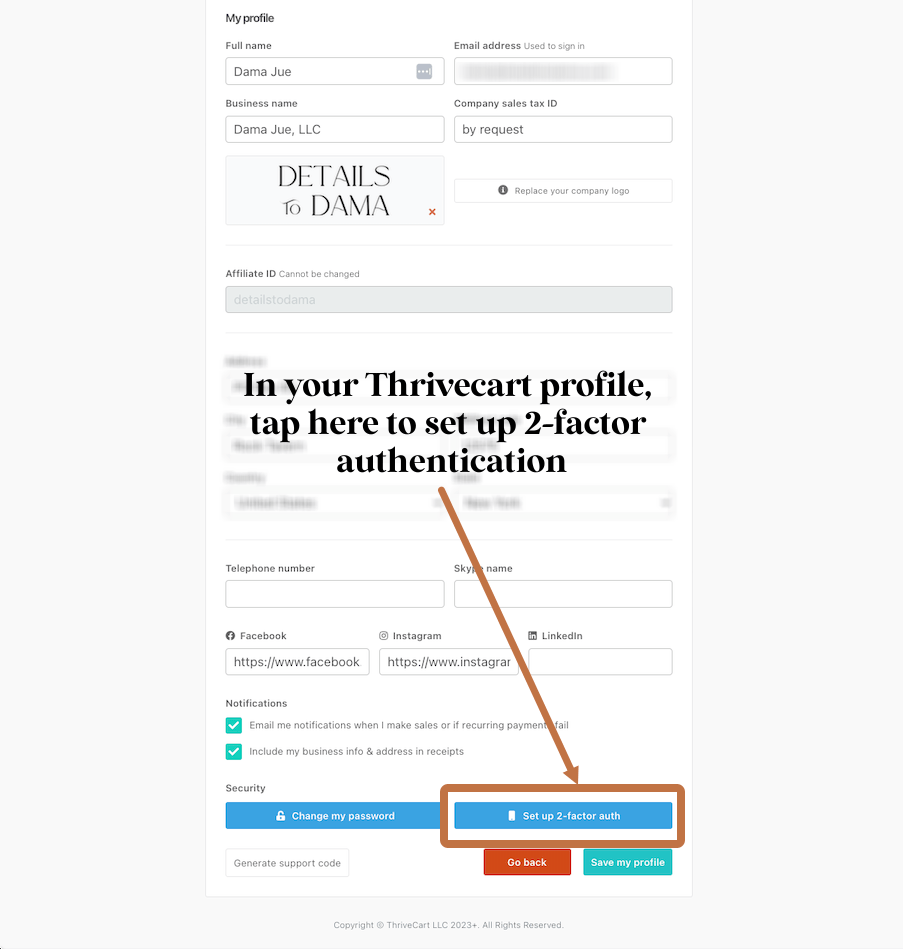
1) Enable two-factor authentication for your Thrivecart account
You're likely already very familiar with this security protocol, but it can go a long way to protecting your account from spammers or when your favorite password storage app has a breach, like LastPass did in December, 2022.
How to enable two-factor authentication on your Thrivecart account
Log in to your ThriveCart account
Click on your profile icon in the top right corner
Select “Profile”
Scroll to the bottom of your profile page and enable 2FA by clicking the button “Set up your 2-factor auth” and following the prompts.
NOTE: Many Thrivecart users find that despite checking the box “remember me on this computer for the next 30 days,” they still need to authenticate their login credentials every single time they log in to their account. While annoying, it's still better than risking potentially losing access to your account.
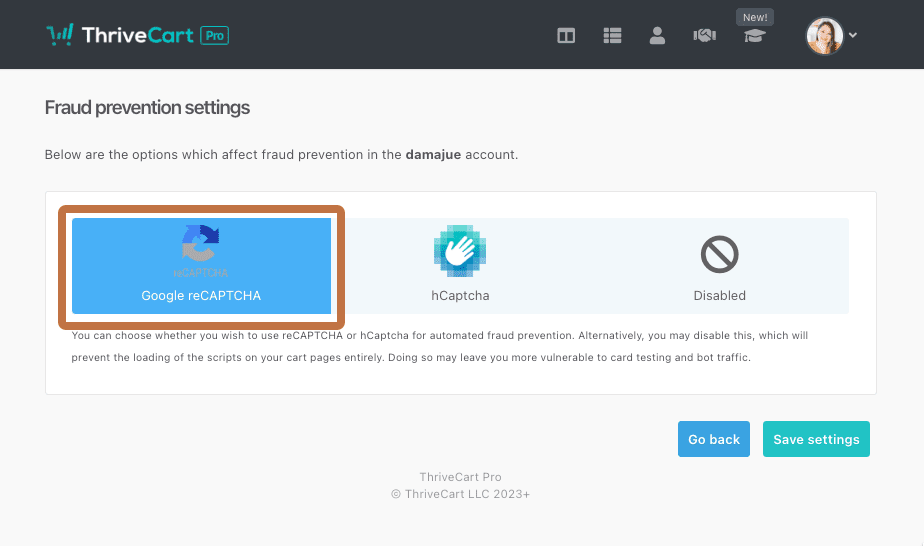
2) Enable fraud prevention via Captcha security protocols on your Thrivecart account
We've all seen Captcha (or ReCaptcha) boxes before: they usually look like a checkbox that says, “Click here to confirm you're a human” or something like that, and sometimes they make you do a puzzle or identify traffic lights or fire hydrants. However, enabling Fraud Prevention for your Thrivecart account with Captcha will not add a Captcha checkbox to your Thrivecart checkouts. In most instances, it will be invisible. In the instance that the system is not sure a real person is attempting the purchase, or their appears to be an issue or risk with that card, a traditional Captcha box will appear.
I've been told that adding this feature to your Thrivecart account may slow your checkouts down by a second or two, but I strongly recommend it anyway. Card Testing scams are now common and I've had 2 friends whose accounts have been impacted. Enabling the anti-fraud Captcha on their checkouts could have prevented this.
How to enable Fraud Prevention in Thrivecart with Captcha
Log in to your ThriveCart account
Click on “Settings” in the left-hand menu
Click on “Account-wide Settings”
Click “Fraud prevention”
Enable “Google reCAPTCHA”
I recommend using “Google ReCaptcha” but you may wish to test both. If you don't have either of these settings enabled, I strongly recommend you GO NOW to set this up.
3) Grant your VA or team members access to your Thrivecart account via the Users feature, not by sharing your login.
I can't stress this enough – for the absolute strongest Thrivecart account security, no one should have full admin access to your Thrivecart account other than you if at all possible. Instead, never share your Thrivecart login and grant access to your account via the subusers feature. If you have Thrivecart Pro, you're able to add up to 5 additional users with customizable access to your account, for a total of 6 logins, including your own. I believe this is not available for regular Thrivecart accounts, but if it were me, I'd upgrade to Thrivecart Pro just to get access to this.
Within the Users settings, you're able to create a new user account and customize, down to a product-by-product level, which courses and products your team member has access to, whether or not they can delete products, see statistics like sales data and conversion rates, look up customers, perform refunds, or manage your affiliates.
How to create user accounts for your team members or contractors in Thrivecart
Log in to your ThriveCart account and go to the “Settings” section.
Click on the “Subusers” tab. You can also find the Users menu by clicking your profile picture in the upper right corner and then clicking Users.
Click the “Add Subuser” button to add a new subuser.
Enter the subuser's first and last name and email address. The rest of the fields (Country, State, Zip code, etc.) are optional.
Choose the App Permissions tab to customize what access you want to give to the new subuser. ThriveCart offers a variety of permission levels, from read-only access to full control over your account, broken down into these categories: Coupons, Learn, Statistics, Affiliates, Users, and Settings.
Click the Product Access tab to customize which products the subuser will have the ability to see and edit inside their dashboard. NOTE: Your subuser will not have the ability to create new products, only the primary user (you) can do that. However, you can create a product, Save and Exit, and then allow your subuser to handle all the other settings, design, and set up tasks.
Last, click the Course Access tab to customize which courses your subuser will be able to see and edit within their account. Approvals are given on a project-by-project basis. Projects inside Thrivecart Learn are simply folders used to organize your courses. You cannot grant access on a course-by-course basis.
Click the Save button to create the subuser.
Thrivecart will send your new subuser an email notifying them they've been added to your account and prompting them to set up a password.
To manage your subusers, head back to the Users menu to edit their permissions, reset their password, or delete their account. If you make any changes, such as removing access to a product or project, they will be notified via email.
4) Create a unique, strong password for your Thrivecart account and don't add it to your LastPass or save it to your browser.
Start with a strong, complex password and consider not storing it anywhere. This is totally optional, but services like password-storing apps have data breaches often and it might just be one more step to protecting your account and preventing you from losing all your valuable work and products.
Suggestions for creating a strong, secure Thrivecart password:
Use at least 12 characters
Use a combination of upper and lowercase letters, numbers, and symbols
Avoid using common words or phrases, especially avoiding meaningful words like your name, a spouse or child's name, or your birthdate or birth year
Don't reuse passwords across different accounts – only use this password for your Thrivecart account
5) Check your transactions regularly, both in Thrivecart and in your payment processors like Stripe and Paypal
It's never a bad idea to keep an eye on your ThriveCart transactions and be alert to any suspicious activity, like a sudden uptick in orders or a high number of refunds. I also routinely, usually weekly, log in to my Stripe account and keep an eye on how many failed payments have occurred that week.
Failed payments are not necessarily a sign of an attack, as sometimes cards simply get declined, but I do pay attention if its a customer trying to purchase multiple times, or if there are several failed purchases all occurring close together. I'd recommend checking your transactions at least once a week to stay on top of any trends or sudden increases in failed payments or purchase attempts.
If you suspect you're under a card testing attack, immediately contact Thrivecart and Stripe and see our recommendations and guidelines as listed at the top of this article.
Bonus tip for extra fraud prevention if you use Stripe as one of your payment processors in Thrivecart
Stripe recently introduced a new layer of security to all payments processed via their service, Radar. You can find more details on Stripe's site here, but the basic premise as of 2023 is Stripe will charge you an extra $0.05 USD per transaction to process extra checks to prevent fraud. I recently enabled this after my friends experienced Card Testing attacks and have not noticed any adverse affects, lost sales, or conversion dips. If you offer split-pay or payment plans on your digital products, this can also help to reduce the number of defaulted/incomplete payment plans you have to deal with.
Spam or scam attacks are not going away, and scammers will continue to innovate and find new ways to make a quick buck, but by following these tips and best practices, you can help protect your ThriveCart account from scammers and spammers. While not fail-proof, implementing security and fraud prevention measures like limiting enabling 2FA, using CAPTCHA on all your checkouts, creating a strong, secure password, and adding your team members to your Thrivecart account as subusers rather than sharing your login details with them directly, can all help to make your Thrivecart account, transactions, customers, and digital assets like your courses and products stored in Learn, more secure.
If you're an entrepreneur or course creator, you know that digital products can be a great source of revenue. There are so many different types of digital products you can create. But how do you create a digital product that will fly off the shelves? In this blog post, we'll share 7 steps to creating a digital product that your audience will love.
What is a Digital Product?
A digital product is a type of information product that can be delivered entirely online. It's typically a downloadable or importable file, like a training video, template, ebook, or PDF. There are many different ways to package up a digital product!
The power of digital products is that they can be sold over and over again. They are a fantastic type of offer because they are evergreen (meaning they’re always available, not just during certain times of the year), and they're pretty close to passive income – sometimes folks just happen on them, and they’re the right product at the right time, and they purchase immediately.
The 7 Steps to Creating a Digital Product That Sells
If you landed here by Googling ‘how to create a product to sell' or ‘selling digital products', you're in the right place. We always hear how amazing digital products are and why they're so beneficial. But there's not a lot of practical advice about creating digital products.
1) Figure out what problem your product will solve
Creating a successful digital product starts with determining what problem it will solve for customers. You need to identify both the problems your prospects have and potential solutions your product or service can offer them.
From there, you can craft an effective selling strategy that appeals to their needs, so you can generate higher conversion rates and ultimately strengthen customer satisfaction.
Once you figure out what problem your products solve, you are well on your way to building strong selling relationships with clients.
2) Do your research and make sure there's a market for your product
Making digital products is an exciting venture, and sometimes it can be tempting to go right into creating the product. However, it's important not to skip the research process! Doing thorough market research will ensure that your digital product has potential customers. After all, there's no point in making a digital product if no one is interested in buying it.
It may take some extra time upfront, but doing your research will pay off as you launch your digital product into the world.
3) Figure out the deliverables
Working out how to deliver digital products can be a tricky process, but it doesn't have to be! By taking a systematic approach and breaking the task into smaller deliverables, you'll soon find that understanding how it all comes together is much less daunting.
Taking the time to map out each step of how your product should come together makes the whole process much easier and ensures you don't miss any important details.
When deciding the format of your digital product, it's essential to consider 3 things:
What makes sense for the topic?
You won't want to do a digital product on a tech tool with a private podcast feed. It wouldn't make sense because your audience needs to see your screen.
What makes sense for your audience?
Does your audience love listening to podcasts? Are they super busy and prefer shorter 5-10 minute videos over a 2-hour workshop replay? Always consider your audience and what will work best for them.
What makes sense for you?
If you don't want to be on camera, don't! There may be a way to take your digital product idea and turn it into an ebook or a set of done-for-you templates.
Establishing critical milestones along the way also helps ensure you stay on track and ultimately successfully deliver your digital product. Remember, a digital product can be super simple, like a spreadsheet, or it can become something more robust, like a mini-course.
Speaking of deliverables, if you’re wondering how I deliver my digital products, including templates, workshops, trainings, courses, and bundles, I use Thrivecart as my full-funnel solution, from sales page to delivery. Want to take a peek at how I use Thrivecart as my complete funnel software? Tap here to watch a free 15-minute behind-the-scenes video.
4) Find a way to stand out from the competition
Navigating a competitive marketplace can be difficult, but if you're wise enough to go in prepared, you can stand out. Taking time to do competitor research and learn what they offer will give you insight into your unique value.
Consider creating a digital product that caters to your niche customers and provides them with something no one else is offering. Remember that sometimes your digital product's most unique selling feature is YOU. Your experiences and training style are different from everyone else's. That's where you can differentiate your product from others that look or sound similar.
Going the extra mile will surely make an impression and get you noticed!
5) Build an audience for your product before you launch it
When pre-selling a product, the purpose is to create anticipation and generate interest prior to launch. A presell strategy can involve entering pre-sales data in a CRM system, limiting the number of pre-purchased items, or hosting livestream events and releasing exclusive content.
When designing presell strategies for digital products, putting together incentives like pre-order discounts and partnering with partners or affiliates who will talk about it can help build an audience before you launch your product.
Implementing presell strategies right at the start of your product’s development lifecycle gives you the best chance at success. You’ll have time and the opportunity to make any necessary changes based on early feedback generated by your presell efforts.
6) Make sure your product is priced correctly
So many of us struggle with pricing! When pricing a digital product, it's important to keep in mind a few key points.
First and foremost is the time and energy you've spent creating your product: pricing it too low may not give it the value it deserves. But, pricing it too high could cause buyers to question whether or not they should make that purchase.
It also helps to have an understanding of customer demographics; if your product sells primarily among a particular demographic, pricing it realistically for that demographic can be very beneficial for sales.
Ultimately, setting the right price for your digital product could make all the difference in finding success with customers. But pricing is something that is going to be different for everyone. It depends on your current audience, your other offers, etc.
You can always increase the price later on!
7) Create an Evergreen Sales Funnel
Now that you have your digital product created and it's sold a few times, it's time to add it to an evergreen sales funnel. Remember to ask for testimonials for your digital product from your customers. This social proof is so valuable for your evergreen sales emails and sales page for the digital product.
The final stage in creating a successful digital product is to build an effective sales funnel that will help you to continually sell and engage with customers over time. By making an evergreen sales funnel, you can take advantage of various automated marketing tactics, such as email marketing, lead nurturing, and social media engagement.
Final Thoughts
If you're thinking about launching a digital product, following these steps will help ensure that your digital product is successful. By taking these steps, you'll set yourself up for success when you launch your digital product. If you want to sell your products using ThriveCart, check out our template shop for beautiful conversion-focused checkout templates.