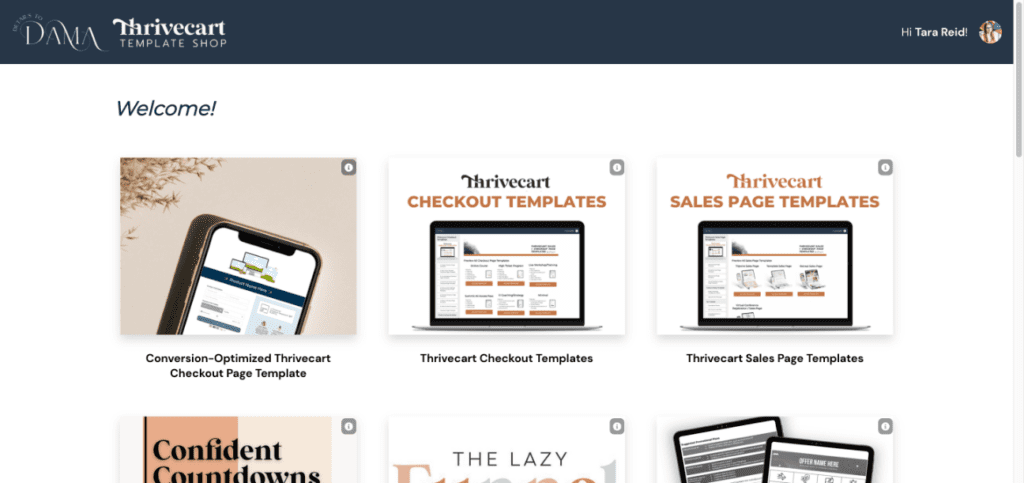
When ThriveCart first came out with ThriveCart Learn, I was beyond excited and knew that it would change the game for course creators. Because ThriveCart Learn is still relatively new as a course platform, I get asked about it all the time. In this blog, you will learn everything you need to know about using ThriveCart Learn.
If you’re thinking about purchasing ThriveCart or switching your digital products and courses to ThriveCart Learn, keep reading!
What is ThriveCart Learn?
ThriveCart Learn is a course hosting platform from ThriveCart that was introduced in 2021. You can host courses, programs, digital products, and even memberships on ThriveCart Learn.
ThriveCart Learn Pricing:
ThriveCart Learn is included with your purchase of a lifetime ThriveCart account. The option to upgrade to the Learn+ version is available for an additional one-time price of $195.
ThriveCart Learn vs ThriveCart Learn Plus
What are some of the big differences between ThriveCart Learn and ThriveCart Learn+? I strongly recommend adding on the one-time upgrade to Learn+ because of these fabulous features included:
Bundles
You can easily create ‘bundles’ of products that someone will automatically be enrolled in by purchasing one product. This is an excellent feature if you want to sell bundles of products or automatically add access to a bonus.
Advanced Tagging and Sequences
With Learn+, you can tag certain purchasers and give them access to exclusive lessons (like for pay-in-full bonuses). There are many ways you can use the advanced sequences and tagging features!
Custom Subdomains
Want to have a custom subdomain for your courses and login? You can easily set this up in minutes with Learn+.
Student Imports
With Learn+, you can easily import students using a CSV file.
How to Use ThriveCart Learn and Learn Plus
ThriveCart Learn is super easy to use! Probably the most significant benefit of using ThriveCart Learn (especially if you’re already using ThriveCart for your checkout pages) is no recurring fee. For the same type of features, on Kajabi, for example, you could be paying upwards of $199 per month.
Here’s what it looks like when a student is logged in to my ThriveCart Learn Dashboard:
And here’s how I’ve branded some of my individual courses hosted on ThriveCart Learn:
Your Biggest ThriveCart Learn Questions:
1) Is it possible to easily import students from another course platform?
Yes! If you purchase the one-time upgrade of Learn+, you can easily import students from a CSV file.
2) Can you host a membership on ThriveCart Learn?
You can! You would set up your checkout pricing as a subscription model and host the membership content inside ThriveCart Learn. The only drawback to a membership is that ThriveCart doesn’t automatically figure out end dates.
For example: A customer signs up for an annual membership in March and cancels in August. They paid for a year, so they should still have access until the following March. However, ThriveCart removes access immediately. So, you might have to set up some back-end admin processes to make it work for you and your membership. See this article for tips on how to handle that.
3) How tech-savvy do I need to be to use ThriveCart Learn?
ThriveCart Learn is pretty easy to use once you get the hang of it. There are certain hacks you can learn to make things easier. If you get stuck, check out this epic resource for Thrivecart.
4) How can I add videos to lessons?
ThriveCart is not able to host videos. Any videos in ThriveCart Learn need to be embedded into the lesson from another video hosting service. The most popular options are Vimeo or, my personal choice – Screencast-O-Matic. I use it to record, edit and host all my course content..
5) How can I easily brand and customize ThriveCart Learn?
ThriveCart Learn is the most customizable course platform out there! You can customize everything to make it your own and match your brand. There are so many design settings!
Time-saving hack: For every new product you create – set up the branding, style, and various blocks as a ‘template lesson’ that you can duplicate. That way, all of your design settings are saved and will look cohesive.
ThriveCart Learn Review: Final Thoughts
I can’t recommend ThriveCart Learn enough! If you’re ready to say goodbye to the costly monthly fees and move things over to ThriveCart Learn – you won’t regret it. ThriveCart Learn is powerful, easy to use, and flexible – the perfect combination for your online course business.
Want to launch your next digital course, group program, or service offer? Creating your live launch method can help you to love live launches again. When done correctly, live launches are a great way to build anticipation and excitement for your product or service. They can also help you to generate more sales and increase profits. In this blog post, we will discuss the steps that you need to take to create your own live launch method. We will also provide tips on how to market your product or service before the launch takes place.
Live Launches vs Evergreen
One of the key differences between live and evergreen launches is that live launches typically generate more excitement and anticipation as they take place in real time. This can be an advantage, as it allows you to build greater momentum leading up to your launch date and capture the attention of potential customers or clients.
However, live launches can also be energy draining.
The best live launch method is one you use in combination with an evergreen launch strategy! That way, you get the best of both worlds.
Get my free resource, How to Go Ever(Green), to create a better evergreen strategy and sales funnel.
The 3 Phases of a Live Launch Method
There are typically three phases to a live launch method: the pre-launch phase, the live launch itself, and the post-launch phase.
1) Phase One: Pre-Launch Marketing
The first step in creating your live launch method is to focus on pre-launch marketing efforts. This can include things like building anticipation and excitement on social media and running email marketing campaigns.
The goal of the pre-launch phase is to warm your audience up and get them ready to buy.
You're not necessarily selling here. You are providing value and building the know, like, and trust factor with your audience. You're getting them excited about what's coming up!
How Long Is the Pre-Launch Marketing Phase?
There is no one-size-fits-all answer here. Typically it's 2-6 weeks before your cart is open.
But it really depends.
I know that doesn't sound very helpful… but here are some things to think about:
How warmed up is your audience? Have you been marketing and showing up consistently? Is your offer's topic completely different from anything you've done before? Does your offer help with a problem your ideal customer is already aware of? If not, you should spend more time during the pre-launch phase creating that awareness first.
2) Phase Two: Live Launch
Once you have built up a strong base of pre-launch marketing activities, it's time to launch live! During this phase, you will typically hold live webinars or live Q&A sessions, where you can engage directly with your audience and answer their questions about your product or service.
This is the period of time when your cart is open, and all of your launch planning is happening.
In most cases, the highest launch days will be the first day the cart is open and the last day. So, if you find yourself in a middle of the cart slump, know that is normal. Don't stop engaging, networking, and talking about your launch!
Email Marketing Tip for Live Launches:
Not everyone on your list is interested in every offer. Maybe it's not the right time, or maybe it's not the correct format for them. That's okay! Add an opt-out feature to the top of your live launch sales emails so those people can opt out during the launch period but still remain on your email list.
How do you do that? With most email marketing providers, you can add a trigger or rule where when someone clicks on a link, a tag is added to their contact record in your email service provider. Then, make sure future promo emails for your launch are sent to everyone except people with that opt-out tag. I’ve done this successfully with MailerLite, ConvertKit, and ActiveCampaign.
3) Phase Three: Post-Launch
You did it! Your live launch has wrapped up, and sales of your offer have concluded, well done!
Now it is important to continue marketing your product or service in order to drive further sales and increase revenue, especially if you have an evergreen marketing strategy. I recommend making the offer available at full price year-round, and when your live launch is over, redirecting that sales page to the year-round, always-open offer for that product. You’d be surprised how many folks will join after the live launch is over, simply because they missed your emails or regretted not purchasing it during the launch.
This may involve running email marketing campaigns, promoting your product on social media platforms, or reaching out to potential customers or clients through other channels. With the right strategy and planning, a live launch can be an extremely effective way to grow your business.
During the post-launch phase, you'll also want to do a launch debrief to review your live launch.
What Should You Look At For a Launch Debrief?
There are several different factors that you should consider when doing a launch debrief, including your pre-launch marketing activities, live launch performance metrics such as webinar attendance or Q&A session engagement, and post-launch marketing performance.
This free guide on evergreen sales funnels will show you how to analyze your live launch and which pieces to repurpose for your evergreen funnel, includes a fillable workbook to help you identify your funnel's strengths and create an action plan, and my favorite tech tools to get all this done. Grab that here!
Other important elements to look at include customer feedback and reviews, as well as your overall sales results. By analyzing these various aspects of your live launch, you can identify improvement areas and continue optimizing your live launch method over time.
This data can also help you fine-tune your evergreen sales funnel for the course or offer. And when you're ready to run your next live launch, you'll know exactly what to focus on for even greater success!
Final Thoughts
Whether you are new to live launches or have been doing them for years, there is always room for improvement. By taking the time to plan, strategize, and optimize your live launch method, you can create a successful and profitable launch that will help grow your business over time.
And don't forget to make the more sustainable choice for more revenue and turn your live offer into an evergreen offer, too. Your income, audience, and sales, will thank you later.
With the correct live launch method and planning, you can make more money and love live launches again!
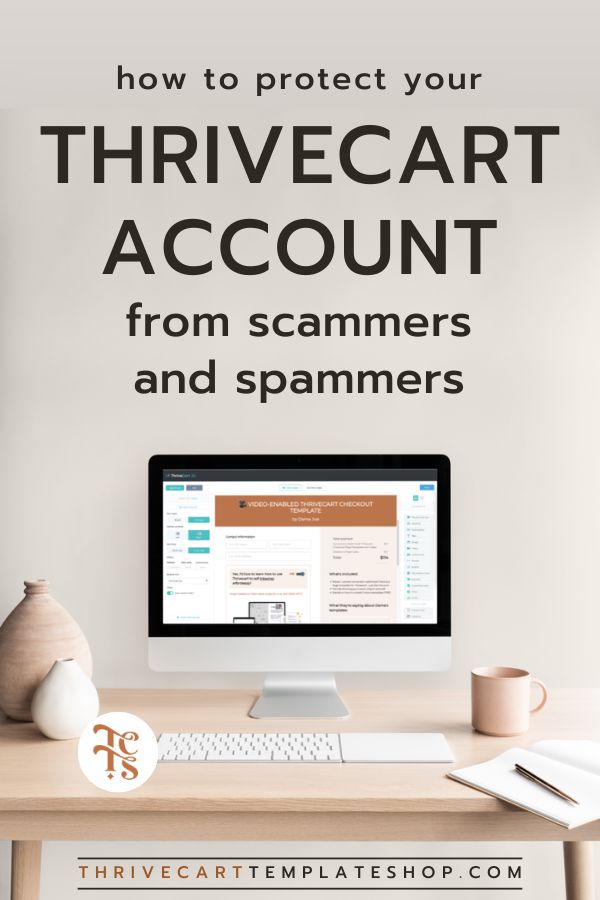
A new threat in Thrivecart account security are scams called Card Testing scams. In this post, I'll share my best tips for protecting your Thrivecart account from Card Testing scams and other security risks.
Along with protecting your Stripe and Paypal accounts, protecting your Thrivecart is also crucial for protecting your business, your digital assets, and ensuring you and your customers have uninterrupted access to their purchases if you use Thrivecart Lear to host your courses and digital products.
What are Card Testing scams and are Thrivecart accounts at risk?
Card testing scams are one of the most common scams and have recently become more prevalent with Thrivecart accounts. Here's what happens: scammers purchase or otherwise acquire -aka steal- lists of credit card numbers. Before they make big purchases with them, they first want to test and see which cards are still valid, active accounts, so they make a LOT (hundreds, or sometimes thousands) of small purchases, often for $0.00 or as little as $1 or as much as $10, to see which transactions go through. They need a valid payment processor for their scam, so they might use an unsuspecting Thrivecart account or checkout to test their purchases. Once their small purchase goes through, they then move on to make bigger purchases with that credit card, for luxury goods, clothing, electronics or other expensive purchases.
How to know if you are under a Card Testing attack and what to do
I recently spoke with two creators who had to deal with a Cart Testing attack on their Thrivecart and Stripe accounts. Each scam will be different, but I want to share some similarities so you can recognize what's happening and take immediate action.
Both creators sell digital products via their website and take payment via Thrivecart. Their attacks occurred between December 2022 and January 2023.
Here are the similarities between two recent card testing attacks involving Thrivecart and Stripe:
Neither creator saw any unusual activity in their Thrivecart account – no new transactions, purchases, refunds, etc.
Their Thrivecart and Stripe logins had not been compromised and they did not lose access to their dashboards or accounts. Their real customer data was not breached or compromised
Their attacks started gradually, with just one or two small charges, either for $0 or $6, a day, and then increased. It's clear that these were processed via a bot
The customers whose cards the scammers were using were not charged, as the charges were either $0 or were marked as pending in Stripe, but in some instances, the attempted charge still showed up on the customer's credit card statement
These creators only became aware they were under attack when they saw the pending charges when they logged in to their Stripe accounts – again, there were no transactions or changes on Thrivecart, or when they were contacted about the attempted charges customers saw on their credit card statement.
Stripe may or may not notify you of a potential attack – one of these creators received a single email from Stripe after weeks of being under attack, the other was never contacted by Stripe
In both instances, Thrivecart and Stripe both claimed the breach was on the other's platform. The transactions were processed via Open API via Stripe, but associated with Thrivecart products (as in, there was one product singled out and used to test thousands of cards). If any funds had actually been processed, the creators would have had to refund the charges and eat the Stripe fees.
Both creators could only stop the attack by pausing or requesting a temporary hold on their Stripe account. Their Thrivecart accounts were able to function normally using Paypal as a payment processor.
If you think you may be under a card testing attack, immediately open support tickets with Thrivecart and Stripe. You may also want to have Stripe freeze your account. Lastly, consider creating a notification for your site (such as a pop up or a footer bar notification) that you are aware of the transactions and are taking action. While that may seem scary and vulnerable, it's never a bad thing to be as transparent as possible and have documented proof that you notified site visitors of a potential issue as the people who are innocent victims of the scam may be looking up your site to investigate the problem.
As with all things Thrivecart account security and general online security, the best course of action is to prevent falling victim to card testing scams and other potential security issues for your e-commerce business in the first place with a few basic preventative steps.
Here are 5 tips to protect your Thrivecart account security:
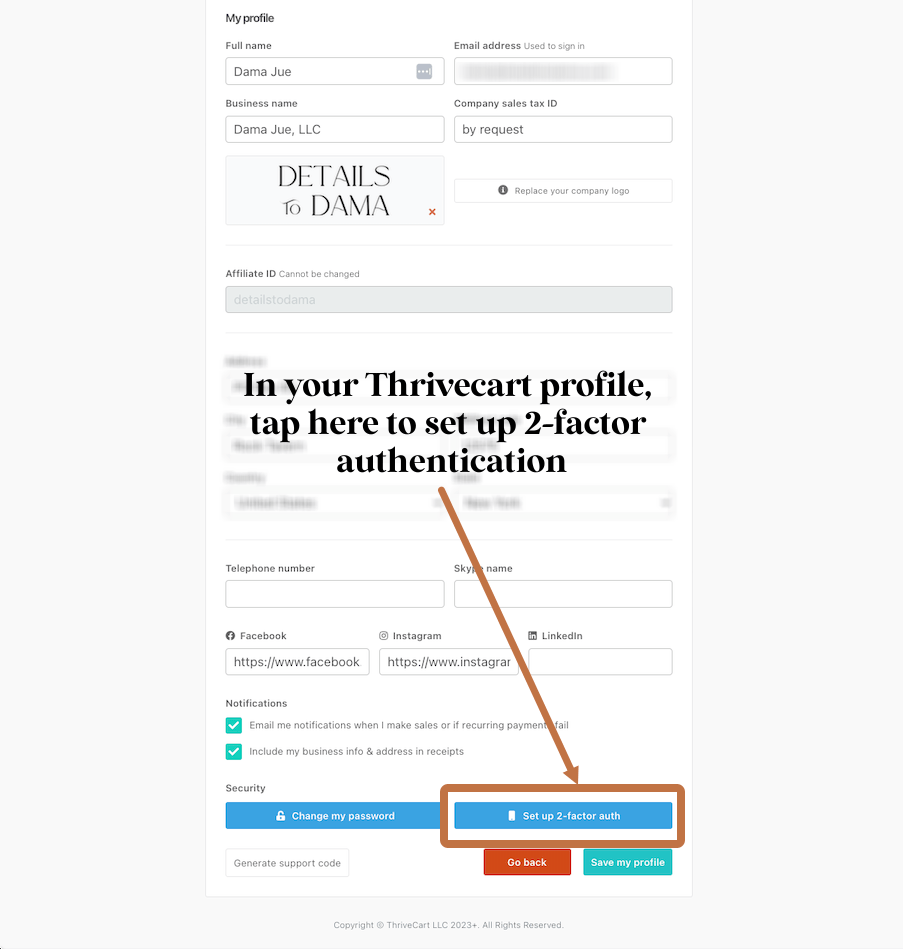
1) Enable two-factor authentication for your Thrivecart account
You're likely already very familiar with this security protocol, but it can go a long way to protecting your account from spammers or when your favorite password storage app has a breach, like LastPass did in December, 2022.
How to enable two-factor authentication on your Thrivecart account
Log in to your ThriveCart account
Click on your profile icon in the top right corner
Select “Profile”
Scroll to the bottom of your profile page and enable 2FA by clicking the button “Set up your 2-factor auth” and following the prompts.
NOTE: Many Thrivecart users find that despite checking the box “remember me on this computer for the next 30 days,” they still need to authenticate their login credentials every single time they log in to their account. While annoying, it's still better than risking potentially losing access to your account.
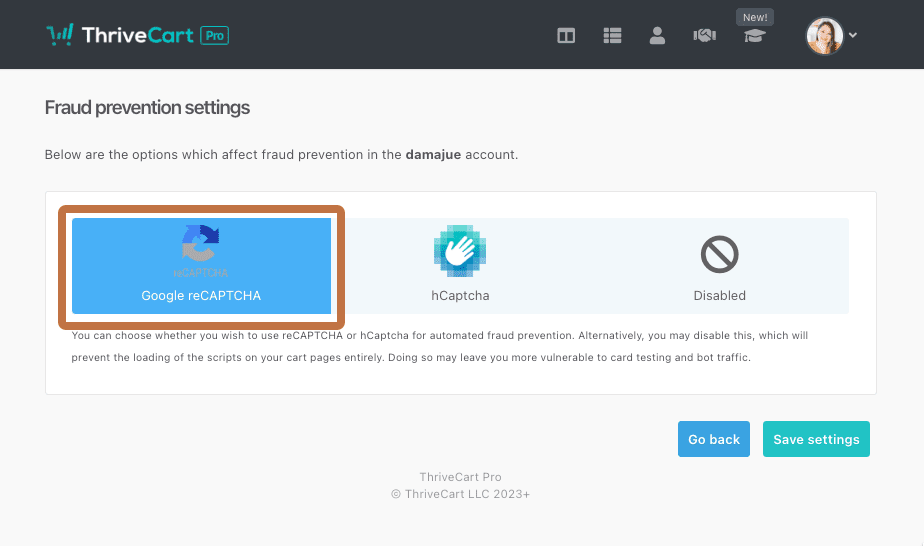
2) Enable fraud prevention via Captcha security protocols on your Thrivecart account
We've all seen Captcha (or ReCaptcha) boxes before: they usually look like a checkbox that says, “Click here to confirm you're a human” or something like that, and sometimes they make you do a puzzle or identify traffic lights or fire hydrants. However, enabling Fraud Prevention for your Thrivecart account with Captcha will not add a Captcha checkbox to your Thrivecart checkouts. In most instances, it will be invisible. In the instance that the system is not sure a real person is attempting the purchase, or their appears to be an issue or risk with that card, a traditional Captcha box will appear.
I've been told that adding this feature to your Thrivecart account may slow your checkouts down by a second or two, but I strongly recommend it anyway. Card Testing scams are now common and I've had 2 friends whose accounts have been impacted. Enabling the anti-fraud Captcha on their checkouts could have prevented this.
How to enable Fraud Prevention in Thrivecart with Captcha
Log in to your ThriveCart account
Click on “Settings” in the left-hand menu
Click on “Account-wide Settings”
Click “Fraud prevention”
Enable “Google reCAPTCHA”
I recommend using “Google ReCaptcha” but you may wish to test both. If you don't have either of these settings enabled, I strongly recommend you GO NOW to set this up.
3) Grant your VA or team members access to your Thrivecart account via the Users feature, not by sharing your login.
I can't stress this enough – for the absolute strongest Thrivecart account security, no one should have full admin access to your Thrivecart account other than you if at all possible. Instead, never share your Thrivecart login and grant access to your account via the subusers feature. If you have Thrivecart Pro, you're able to add up to 5 additional users with customizable access to your account, for a total of 6 logins, including your own. I believe this is not available for regular Thrivecart accounts, but if it were me, I'd upgrade to Thrivecart Pro just to get access to this.
Within the Users settings, you're able to create a new user account and customize, down to a product-by-product level, which courses and products your team member has access to, whether or not they can delete products, see statistics like sales data and conversion rates, look up customers, perform refunds, or manage your affiliates.
How to create user accounts for your team members or contractors in Thrivecart
Log in to your ThriveCart account and go to the “Settings” section.
Click on the “Subusers” tab. You can also find the Users menu by clicking your profile picture in the upper right corner and then clicking Users.
Click the “Add Subuser” button to add a new subuser.
Enter the subuser's first and last name and email address. The rest of the fields (Country, State, Zip code, etc.) are optional.
Choose the App Permissions tab to customize what access you want to give to the new subuser. ThriveCart offers a variety of permission levels, from read-only access to full control over your account, broken down into these categories: Coupons, Learn, Statistics, Affiliates, Users, and Settings.
Click the Product Access tab to customize which products the subuser will have the ability to see and edit inside their dashboard. NOTE: Your subuser will not have the ability to create new products, only the primary user (you) can do that. However, you can create a product, Save and Exit, and then allow your subuser to handle all the other settings, design, and set up tasks.
Last, click the Course Access tab to customize which courses your subuser will be able to see and edit within their account. Approvals are given on a project-by-project basis. Projects inside Thrivecart Learn are simply folders used to organize your courses. You cannot grant access on a course-by-course basis.
Click the Save button to create the subuser.
Thrivecart will send your new subuser an email notifying them they've been added to your account and prompting them to set up a password.
To manage your subusers, head back to the Users menu to edit their permissions, reset their password, or delete their account. If you make any changes, such as removing access to a product or project, they will be notified via email.
4) Create a unique, strong password for your Thrivecart account and don't add it to your LastPass or save it to your browser.
Start with a strong, complex password and consider not storing it anywhere. This is totally optional, but services like password-storing apps have data breaches often and it might just be one more step to protecting your account and preventing you from losing all your valuable work and products.
Suggestions for creating a strong, secure Thrivecart password:
Use at least 12 characters
Use a combination of upper and lowercase letters, numbers, and symbols
Avoid using common words or phrases, especially avoiding meaningful words like your name, a spouse or child's name, or your birthdate or birth year
Don't reuse passwords across different accounts – only use this password for your Thrivecart account
5) Check your transactions regularly, both in Thrivecart and in your payment processors like Stripe and Paypal
It's never a bad idea to keep an eye on your ThriveCart transactions and be alert to any suspicious activity, like a sudden uptick in orders or a high number of refunds. I also routinely, usually weekly, log in to my Stripe account and keep an eye on how many failed payments have occurred that week.
Failed payments are not necessarily a sign of an attack, as sometimes cards simply get declined, but I do pay attention if its a customer trying to purchase multiple times, or if there are several failed purchases all occurring close together. I'd recommend checking your transactions at least once a week to stay on top of any trends or sudden increases in failed payments or purchase attempts.
If you suspect you're under a card testing attack, immediately contact Thrivecart and Stripe and see our recommendations and guidelines as listed at the top of this article.
Bonus tip for extra fraud prevention if you use Stripe as one of your payment processors in Thrivecart
Stripe recently introduced a new layer of security to all payments processed via their service, Radar. You can find more details on Stripe's site here, but the basic premise as of 2023 is Stripe will charge you an extra $0.05 USD per transaction to process extra checks to prevent fraud. I recently enabled this after my friends experienced Card Testing attacks and have not noticed any adverse affects, lost sales, or conversion dips. If you offer split-pay or payment plans on your digital products, this can also help to reduce the number of defaulted/incomplete payment plans you have to deal with.
Spam or scam attacks are not going away, and scammers will continue to innovate and find new ways to make a quick buck, but by following these tips and best practices, you can help protect your ThriveCart account from scammers and spammers. While not fail-proof, implementing security and fraud prevention measures like limiting enabling 2FA, using CAPTCHA on all your checkouts, creating a strong, secure password, and adding your team members to your Thrivecart account as subusers rather than sharing your login details with them directly, can all help to make your Thrivecart account, transactions, customers, and digital assets like your courses and products stored in Learn, more secure.
If you're an entrepreneur or course creator, you know that digital products can be a great source of revenue. There are so many different types of digital products you can create. But how do you create a digital product that will fly off the shelves? In this blog post, we'll share 7 steps to creating a digital product that your audience will love.
What is a Digital Product?
A digital product is a type of information product that can be delivered entirely online. It's typically a downloadable or importable file, like a training video, template, ebook, or PDF. There are many different ways to package up a digital product!
The power of digital products is that they can be sold over and over again. They are a fantastic type of offer because they are evergreen (meaning they’re always available, not just during certain times of the year), and they're pretty close to passive income – sometimes folks just happen on them, and they’re the right product at the right time, and they purchase immediately.
The 7 Steps to Creating a Digital Product That Sells
If you landed here by Googling ‘how to create a product to sell' or ‘selling digital products', you're in the right place. We always hear how amazing digital products are and why they're so beneficial. But there's not a lot of practical advice about creating digital products.
1) Figure out what problem your product will solve
Creating a successful digital product starts with determining what problem it will solve for customers. You need to identify both the problems your prospects have and potential solutions your product or service can offer them.
From there, you can craft an effective selling strategy that appeals to their needs, so you can generate higher conversion rates and ultimately strengthen customer satisfaction.
Once you figure out what problem your products solve, you are well on your way to building strong selling relationships with clients.
2) Do your research and make sure there's a market for your product
Making digital products is an exciting venture, and sometimes it can be tempting to go right into creating the product. However, it's important not to skip the research process! Doing thorough market research will ensure that your digital product has potential customers. After all, there's no point in making a digital product if no one is interested in buying it.
It may take some extra time upfront, but doing your research will pay off as you launch your digital product into the world.
3) Figure out the deliverables
Working out how to deliver digital products can be a tricky process, but it doesn't have to be! By taking a systematic approach and breaking the task into smaller deliverables, you'll soon find that understanding how it all comes together is much less daunting.
Taking the time to map out each step of how your product should come together makes the whole process much easier and ensures you don't miss any important details.
When deciding the format of your digital product, it's essential to consider 3 things:
What makes sense for the topic?
You won't want to do a digital product on a tech tool with a private podcast feed. It wouldn't make sense because your audience needs to see your screen.
What makes sense for your audience?
Does your audience love listening to podcasts? Are they super busy and prefer shorter 5-10 minute videos over a 2-hour workshop replay? Always consider your audience and what will work best for them.
What makes sense for you?
If you don't want to be on camera, don't! There may be a way to take your digital product idea and turn it into an ebook or a set of done-for-you templates.
Establishing critical milestones along the way also helps ensure you stay on track and ultimately successfully deliver your digital product. Remember, a digital product can be super simple, like a spreadsheet, or it can become something more robust, like a mini-course.
Speaking of deliverables, if you’re wondering how I deliver my digital products, including templates, workshops, trainings, courses, and bundles, I use Thrivecart as my full-funnel solution, from sales page to delivery. Want to take a peek at how I use Thrivecart as my complete funnel software? Tap here to watch a free 15-minute behind-the-scenes video.
4) Find a way to stand out from the competition
Navigating a competitive marketplace can be difficult, but if you're wise enough to go in prepared, you can stand out. Taking time to do competitor research and learn what they offer will give you insight into your unique value.
Consider creating a digital product that caters to your niche customers and provides them with something no one else is offering. Remember that sometimes your digital product's most unique selling feature is YOU. Your experiences and training style are different from everyone else's. That's where you can differentiate your product from others that look or sound similar.
Going the extra mile will surely make an impression and get you noticed!
5) Build an audience for your product before you launch it
When pre-selling a product, the purpose is to create anticipation and generate interest prior to launch. A presell strategy can involve entering pre-sales data in a CRM system, limiting the number of pre-purchased items, or hosting livestream events and releasing exclusive content.
When designing presell strategies for digital products, putting together incentives like pre-order discounts and partnering with partners or affiliates who will talk about it can help build an audience before you launch your product.
Implementing presell strategies right at the start of your product’s development lifecycle gives you the best chance at success. You’ll have time and the opportunity to make any necessary changes based on early feedback generated by your presell efforts.
6) Make sure your product is priced correctly
So many of us struggle with pricing! When pricing a digital product, it's important to keep in mind a few key points.
First and foremost is the time and energy you've spent creating your product: pricing it too low may not give it the value it deserves. But, pricing it too high could cause buyers to question whether or not they should make that purchase.
It also helps to have an understanding of customer demographics; if your product sells primarily among a particular demographic, pricing it realistically for that demographic can be very beneficial for sales.
Ultimately, setting the right price for your digital product could make all the difference in finding success with customers. But pricing is something that is going to be different for everyone. It depends on your current audience, your other offers, etc.
You can always increase the price later on!
7) Create an Evergreen Sales Funnel
Now that you have your digital product created and it's sold a few times, it's time to add it to an evergreen sales funnel. Remember to ask for testimonials for your digital product from your customers. This social proof is so valuable for your evergreen sales emails and sales page for the digital product.
The final stage in creating a successful digital product is to build an effective sales funnel that will help you to continually sell and engage with customers over time. By making an evergreen sales funnel, you can take advantage of various automated marketing tactics, such as email marketing, lead nurturing, and social media engagement.
Final Thoughts
If you're thinking about launching a digital product, following these steps will help ensure that your digital product is successful. By taking these steps, you'll set yourself up for success when you launch your digital product. If you want to sell your products using ThriveCart, check out our template shop for beautiful conversion-focused checkout templates.
When you're creating an online course, how do you determine how much to charge for it? It can be tricky to find the sweet spot, but with the correct information, you can price your course for maximum profit.
Pricing your online course can be a complicated, even intimidating, process. With the right strategy and a little time, you can price your course effectively and in a way that makes sense for everyone involved.
In this blog post, we'll discuss how to come up with a pricing strategy and how to use a pricing calculator to help you determine the right price for your course.
How Much Should You Charge?
That answer depends on many factors, including the type of learner who will enroll in your course, their goals after taking the course, and more. While I'm happy to provide some things to consider in this blog post, just know that pricing is always subjective. There is no one size fits all answer.
Even the pricing calculators I'll share later in this post should only be used as a guide.
How to Price Your Course Correctly
The first step to pricing your course is deciding what you want the course to accomplish. This is a key decision because it will help you determine how much the course should cost and what kind of revenue it can generate. A lot of this comes down to defining who the target audience is and what they’re hoping to get out of taking your course.
Once you have decided what you want the course to accomplish, determine how much time students need to complete the content.
1. What's the Transformation?
First, you need to determine what type of student you’re going to attract by offering your course. What is the transformation that your online course will help them go through? This is a crucial question to ask before pricing your course.
The most common transformations are:
– Learning new information
– Building professional skills like public speaking, leadership, etc.
– Becoming more productive or efficient in their work
– Gaining knowledge about an industry or topic
Take some time and think about these questions before you create your course. Then ask yourself, ‘what is the true value of this transformation?' Your answers will help guide you as you price your course.
2. Look at the Competition
Pricing online courses can be difficult because there are so many options to choose from. Some courses may have a low price, while others are more costly. There are also varying levels of difficulty and quality that you need to consider.
You should look at the current market for price points for similar courses to get started. If you want your course to be competitive in the marketplace, it’s essential to know what other courses are doing and how they compare with yours on specific metrics like price or course length. You can find this information by looking at reviews or doing your own research.
Don't use competitor research as a deciding factor for pricing; it should just be a consideration and a guide. You don't need to have the cheapest course in the market, and you don't need to have the most expensive one.
So, do your competitor research but don't let it completely sway your pricing decisions.
3. Consider Your Ideal Audience and Their Budget
An important step in pricing your online course is to consider your ideal customer and their budget. The best way to start thinking about how much you should charge for your online course is by figuring out who the ideal learner would be, what they will achieve after taking your course, and if there are any costs associated with that.
Learners who are looking for quick information or insights might not want to spend a lot of time and money on a course. On the other hand, those seeking more hands-on training may wish to pay more because they expect more from their courses. Asking yourself these questions will help you determine what price point is appropriate for each type of learner to maximize revenue opportunities.
For example, a course focused on assisting people to start as a new virtual assistant might be priced lower over a course focused on helping virtual assistants get to $10k months.
That's because people starting might not have a small budget to invest in a course. However, people wanting to scale their business should have more to invest in getting to that next level.
4. Review Your Online Course Deliverables and Value
First, you should understand the type of learner who will enroll in your online course.
There are a few different types of learners:
Self-learners want to learn for personal interest and development but don’t need extra support.
Learners want to improve their knowledge or skills for a specific job or career path.
Once you know the type of learner you are addressing, you can determine what they will get out of your course and how much it will cost them.
For example, if someone is looking for a self-learner who wants to learn something new. They might not need any support after the course is complete. They may only need to spend a few hours learning about a new topic. If someone is looking for employability skills and needs more in-depth learning opportunities with materials such as assessments, exercises, videos from experts, etc. In that case, they may choose an option with more days of instruction at a higher rate.
That’s why it’s important to know whether your course will be a signature course, a mini-course, or a super specific course.
Remember: Just because a course has tons of stuff thrown into it doesn’t mean it’s more valuable. People want quick wins, even for longer signature courses. Be mindful of how much information you’re throwing at your students!
Online Course Pricing Calculator
We’ve discovered the best online course pricing calculators for you. The calculators can help you determine your price point to maximize your revenue and provide value for your customers. Just remember to use these only as a guide:
One of the best ways to increase your revenue when selling digital courses is to offer upsells. Check out Unleashing Upsells to learn how easy it is to increase your average order value.
Not using ThriveCart to sell your online courses? Sign up through my affiliate link to get instant access to my exclusive bonuses.
Final Thoughts
Pricing your online course is a difficult task, but it will ultimately be worth it. If you charge too much for your course, you won’t attract many students, and your business will not thrive.
On the other hand, if you price your course too low, you’ll need to find a way to make up for the lost revenue, which can be difficult.
It’s important to remember that pricing isn’t just about making money — it's also about providing value. That doesn't mean that there is a right or wrong price for your course; instead, it means that there are ways to provide value while charging a fair price.
Bottom line: If you're really struggling with pricing, go with your gut and don’t be afraid to start lower and gradually raise it. You can always change or increase your prices later on!
Loyalty is the cornerstone of a successful membership organization. While it might seem like an obvious pillar, many programs fail to effectively retain members. In fact, the majority of loyalty studies point to member retention as the most important success metric for any membership program.
In order to keep members happy and loyal, it’s essential to have a solid retention strategy in place from the get-go. You see, not everyone will stay once they’ve joined your community. This means you need to create an effective plan right away that will keep your new members around for good.
In this article, we’ll explore different strategies for retaining members — both current and new — so that you can build lifelong customer relationships instead of just one-time guests.
Creating a Membership With ThriveCart and ThriveCart Learn
Before we dig into member retention strategies, did you know that you can create and host a membership on ThriveCart?
It’s true!
You can create a membership product with a recurring subscription payment option and host the membership portal in ThriveCart Learn, like you would a course or digital product.
Looking for a Thrivecart sales page template for your Membership? Shop our full-funnel templates for Thrivecart here.
One Important Challenge for Memberships with ThriveCart:
Right now, ThriveCart doesn’t have the capability to see when the member’s last payment came out for cancellations.
For example: If a member signs up for an annual membership in July and cancels in December, they should keep access until the following July, right? But, ThriveCart immediately removes their access to the Learn product when their membership is canceled.
It’s an important quirk to keep in mind, but it can easily be resolved by using Zapieror Slacknotifications to manually review annual cancellations.
One membership host I asked has this process when a member cancels:
– They receive an automatic cancellation notice in a Slackchannel
– Their VA (virtual assistant) reviews the cancellation dates and adds their access back to the membership in Learn
– Next, the VA creates a task in ClickUp(their project management system of choice) with a due date of the actual date their membership access would expire
– When that due date rolls around, the VA manually removes their access and finalizes the membership cancellation
It’s not a perfect system at the moment, but it works to avoid membership complaints and issues with members not having access to things they should.
Why Is Member Retention Important?
Member retention is necessary because it keeps members engaged. Retaining members not only ensures that the community will be successful in the long term but also prevents members from leaving for competitors.
As a member of a group, you’re more likely to stay if other members are satisfied with the program.
For example, if you’ve been involved in a fitness group for six months. In that case, you’re less likely to leave than someone who was just introduced to the program and had no connection with previous members.
Membership owners should focus on retention as they want to ensure their community is sustainable in the long term and avoids costly membership churn rate spikes.
Member Retention Strategies
1. Personal and Professional Development Strategies
Members can make the best use of their membership by focusing on personal and professional development. The truth is many people leave because they lose touch with memberships after a while. This happens when members stop using their programs to improve themselves and just join for social reasons. But if you focus on personal and professional development, your members will stay engaged throughout their relationship with your program.
One fun way to do this and encourage engagement is by running live events, networking events, or live challenges.
2. Fix Your Onboarding Experience
One of the best ways to create a more ethical and engaging membership program is by focusing on the onboarding experience. If a new member has a wonderful experience right from the start, it makes a great first impression.
A great first experience will make them want to stick around.
Review and improve your welcome videos, your welcome email sequence, and everything else that a new member first experiences.
3. Offer Discounts and Other Negotiating Tools
One way to keep members loyal is to offer them discounts and other negotiating tools. You could easily add in a couple of emails that someone receives at the 50-day mark as a monthly member to upgrade to annual.
Why the 50-day mark? Because we don’t want to offer them this when they just had a monthly payment come out, but we also want to give them some time to think it over.
Another way to keep members around is by offering membership benefits that they can’t find anywhere else. People love exciting additions and exclusive offers! A benefit like this helps retain members for years.
4. Always Get Feedback From Your Members
One of the best ways to keep members engaged and loyal is to ask them what they want. Send market research surveys, let them vote on content – this allows them to feel heard and supported. This strategy will establish you as an accessible resource and make it easier for people to feel connected with your membership.
By engaging in these types of practices, members are more likely to feel like valued customers who know how much you value them.
Conclusion
Member retention strategies are valuable for any business. By implementing these strategies, you can improve the quality of your membership experience and grow your membership!
As an entrepreneur, it's easy to get distracted by shiny new objects or tools. You see a new tool or system that promises to make your life easier, and you immediately want to try it out. Before you know it, you've spent hours researching and testing this new thing – and you never even finish implementing the old thing. This is known as shiny object syndrome, which can be deadly for your business.
In this blog post, I'll discuss how to avoid shiny object syndrome and stay on task. I will also show you how ThriveCart can help you overcome shiny object syndrome once and for all regarding business tools!
What is Shiny Object Syndrome?
Shiny object syndrome, also known as the “never finish anything syndrome,” is a common problem among entrepreneurs and business owners. This condition occurs when you become so easily distracted by new tools and systems that claim to make your life easier.
With so many incredible tools and systems out there designed to help you, it can be hard to avoid shiny object syndrome sometimes. But to be successful and grow your business, you need to stay focused and avoid getting distracted by shiny new objects.
One tool that can help you overcome shiny object syndrome is ThriveCart. ThriveCart is a powerful all-in-one checkout page and funnel builder, allowing you to easily create funnels for any purpose. But that's not all!
If you are a coach or course creator and your tech stack looks a little messy, ThriveCart can help you start to bring everything under one tool.
With ThriveCart, you get the following:
A Powerful and Customizable Checkout Cart
One of the best features of ThriveCart is its conversion-focused checkout pages. They are super easy to customize and are focused on conversions. Not all cart software is created equal, and ThriveCart is one of the best tools for increasing conversions and sales.
Can you build a sales funnel with ThriveCart? Absolutely! This eliminates the need to have another software like ClickFunnels or Leadpages. While you can create your sales pages and funnel pages directly on your website, ThriveCart makes it easy to build them directly into your checkout process seamlessly.
An extra bonus with ThriveCart is the easy ability to add bump offers, upsells, and downsells to your products.
A Robust Affiliate Program
ThriveCart also comes with its own built-in affiliate program. This means you can start building a team of affiliates who help drive traffic and sales to your products and services.
A Completely Customizable Course, Program, and Digital Product Platform
When someone purchases your course, program, or digital product, it's super easy to add them to your student platform directly on ThriveCart, thanks to ThriveCart Learn. With Learn, you can completely customize your students' entire look and feel.
A Solution for Recurring Payments and Membership Offers
ThriveCart also makes it easy to set up subscriptions or monthly membership offers. You can even offer free trials and bundling options!
3rd Party Integrations
ThriveCart connects seamlessly to other tools you might need to use, such as Slack, Google Sheets, and email marketing providers.
If you're struggling with shiny object syndrome and want a simple, powerful tool to help you stay focused and get things done, look no further than ThriveCart. A fantastic almost all-in-one tool to help course creators feel like they are staying on task.
2) Project Management Tools
Another great tool to help prevent shiny object syndrome is a project management tool. Many entrepreneurs and business owners find it helpful to use a project management system, like ClickUp, Trello, or Asana, to keep track of their tasks and projects.
Project management tools can help you stay focused on your most important tasks and goals. They also give you the power to customize the tool to make it work for you through custom fields, automation, and templates.
Plus, many project management tools offer integrations with other popular tools and platforms, like Slack and Google Drive, making it easy for you to stay connected and organized.
If shiny object syndrome is holding you back from achieving your goals, consider using a project management tool to help keep yourself on track. With the right tools and strategies in place, you'll be able to avoid shiny object syndrome – even when a shiny new tool pops up.
3) Accountability Partners
Another great way to prevent shiny object syndrome is to find an accountability partner or group. An accountability partner can be someone you regularly check in with, either in person or via a messaging app like Slack, to make sure you're staying focused on your goals and tasks.
Many entrepreneurs and business owners find connecting with other like-minded people helpful.
One of my favorite places I've connected with people is in Funnel Gorgeous Society. You'll find a supportive community of entrepreneurs who are all working towards similar goals. Whether it's growing your service provider business or launching your next course or product, you'll find people with the same focus and drive as you. I can definitely recommend joining FG Society!
Choosing the Right Tech Stack for Your Business
When it comes to shiny object syndrome and your tech stack, it's important to choose tools that are right for you. When you aren't using the right tools, it's easy to get caught up in shiny object syndrome or never finish anything syndrome. The key is to find a set of systems and tools that work together seamlessly and help you stay focused on what's important.
Final Thoughts
If you're a course creator or coach selling digital products, I can't recommend ThriveCart enough. With its intuitive design and powerful features, ThriveCart is the perfect tool to help you manage so many areas of your business. Use the right tools to stay focused on growing your impact and income. So if shiny objects are tempting you away from what's truly important, it's time to give ThriveCart a try!